Autofilling Two Factor Authentication (2FA) Codes in macOS Chrome
• 6 min read
Looking to escape the constant battery drain of Chrome I've tried switching to Safari a few times this past year but it never sticks. Multiple times a day I had to open Chrome for (decent) Developer Tools and I'm just not interested in using two browsers.
Not long after posting this I saw a cleaner solution from Tyler Hall.
The Problem
One thing I miss from Safari though is autofilling Two Factor Authentication (2FA) codes. If you use Safari or an iPhone you know how awesome this feature is.
😢 Sadly, Chrome doesn't have this feature...
So, unless you have great eyesight and can quickly read and remember the code before the notification disappears you have to do a multi-step process to retrieve it.
The Solution
If I can work out how to read the notification with OCR (Optical Character Recognition) and extract the code I should be able to recreate 90% of the functionality from Safari.
Enter Keyboard Maestro, the Swiss Army Knife of Mac automation.
Version 10 of Keyboard Maestro was just released and it now allows you to OCR an exact area of the screen. Previously, this Macro used a screenshot and cropping but now it's much more simplified.
Step 1.
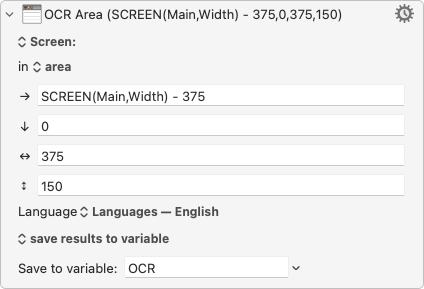
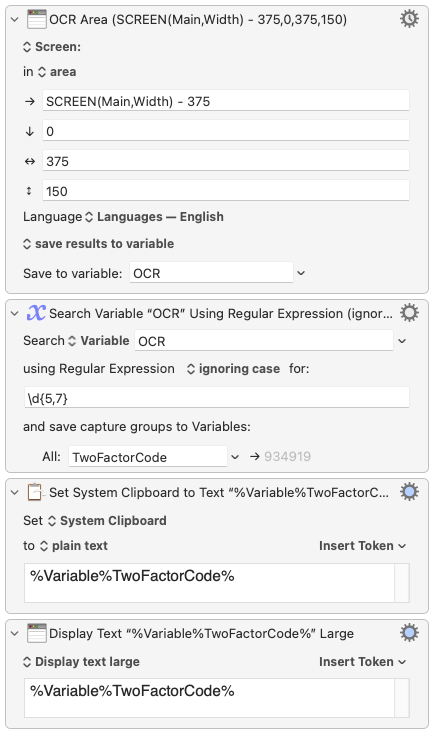
The first thing I need to do is read the screen using the OCR Screen action. But, I don't want to OCR the entire screen as that's a waste of resources and could potentially introduce errors later in the macro.
As you can see below, Keyboard Maestro now allows you to define an exact area of the screen to OCR. You'll need to specify how large of an area should be read (Width and Height), and where on the screen Keyboard Maestro should start reading at (Left and Down).
How did I figure out the Width and Height inputs (and Left offset) for the Crop Image function? I sent myself a test notification...
Then, while the notification was still showing, I took a screenshot (Shift-Command-3), opened it in Photoshop, and measured how far the notification was from the top-right corner. It was 361 pixels from the left and 134 pixels from the right so I padded those numbers just a bit to 375 and 150.
You probably also noticed that I used the SCREEN function to calculate the Left input. I often use my MacBook Pro connected to an external monitor so this ensures I provide the correct Left position no matter what monitor I'm using. The - 375 part offsets the area to the left by the width I determined above since we are working from the top-right corner of the screen.
Also note, I'm saving the captured text to the Keyboard Maestro variable OCR so that I can easily access it in later steps.
Step 2.
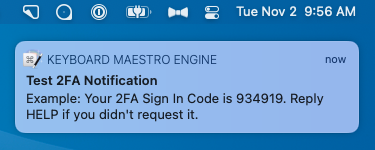
Below is the text captured during the OCR process. As you can see, it contains the code I'm looking for (934919) from the test notification but it also captured stuff I don't want.
QQ © B&H m4 ZB Tue Nov2 9:56 AM
/ KEYBOARD MAESTRO ENGINE now
Test 2FA Notification
Example: Your 2FA Sign In Code is 934919. Reply
HELP if you didn't request it.
To clean this up I'm using the Search using Regular Expression action on the variable OCR.
Regular Expressions (regex) are a deep topic so I won't cover them in detail here but you can learn tons at RegExr.com.
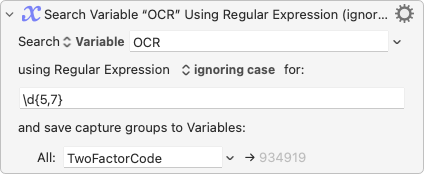
This regex is quite simple. The \d matches any digit character (0-9), and the {5,7} is a quantifier for \d that instructs the search to only match groups of consecutive digits between 5 and 7 digits long. The first match the regex finds will be stored in the variable TwoFactorCode.
To figure out the best regex to capture the 2FA codes, I dumped the last fifteen 2FA codes I had received into (names changed to protect to innocent) RegExr and started experimenting. You can also experiment here and see exactly how this regex works on my list of example notifications.
Why 5 and 7? It's a pretty narrow range and that's to try and minimize errors. Lots of 2FA notifications include the sender phone number in one of two formats, ###-###-#### or ##########. So, if the lower bound of the quantifier range is less than 5, it would capture the parts of the segmented phone number, and if the upper bound of the quantifier range greater than 8 it would capture the non-segmented phone number.
So, why not use 8 for the upper bound then? The quick answer is that I have yet to receive a notification over 7 digits so I'm just trying to eliminate as many potential errors as possible.
Step 3.
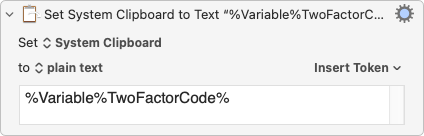
Now that I have captured the code, I place it on the system clipboard so it can easily be pasted into a webpage.
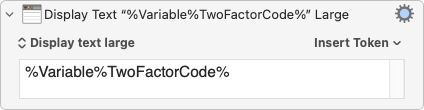
Step 4.
Finally, I display the captured code really large just in case I can't paste it directly into the webpage. This is much easier to read than the small notification and stays on the screen even while you type the code.
Eventually I may turn this particular action off as it can be annoying at times 🤷♂️...
Potential Problems
So, what happens if a code isn't found?
If the regex can't find a matching code in the OCR'd text the macro gets canceled and Keyboard Maestro sends a notification like below.
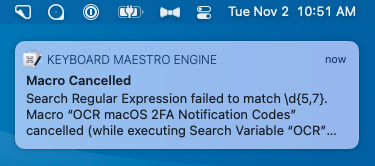
If you find this happening often you may need to adjust your OCR Area placement from Step 1 or you may adjust your lower and upper bounds of the regex quantifier in Step 2.
Final Macro
Here's the final macro in all its glory 🙌.
It's really simple but quite useful. You can download it here if you think it could help make your life a bit easier. It's set up to be triggered by the Hyper Key + 2 (Shift-Control-Option-Command-2). The number 2 is easy to remember for "2FA" and also simple to press quickly with your left hand. ✌️
Pro Tip: If you completely miss the notification you can still OCR it by opening Notification Center and running the macro. The 2FA notification does need to be at the top of the list or it won't be in the capture area Keyboard Maestro is looking at.
Category: productivity
Tags:
chrome,
keyboard-maestro,
macos,
productivity